|
Making a good photo
Topics: Taking the Photo Preparing a Digital File 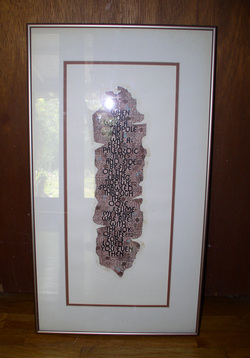 Skewed photo with hot spot & reflections 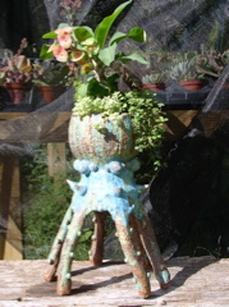 A distractnig background |
Taking the Photo
Artists with limited funds (that is, most of us) have to decide when to pay full price for the best job and when to economize. Photographing your work may be one of the places you can save a few bucks if you already have the necessary equipment and want to learn the basics. You need, at the least, a decent digital camera, a backdrop, and photo editing software. A tripod is helpful. Finally, you need a place that has good lighting. Lighting The right lighting illuminates your art evenly and helps the colors read true in the photo. If you are working indoors, ordinary fluorescent or incandescent bulbs will usually not provide enough light for a good photo. They also emit light with its own color that affects how your art appears. Professional photographers use tungsten or halogen lamps that are very bright and put them on stands so they can be moved for the best effect. Rather than using regular indoor lights, take your photos outdoors on an overcast day or in the shade on a sunny day. Stay out of direct sun to prevent “hot spots,” or areas on the artwork that reflect too much light. Watch out for shadows, especially your own, falling onto the art. Using your camera’s flash indoors can work, but it tends to create a “hot spot” on the image. Media such as acrylic paint or fired ceramic that have a reflective, glossy surface easily create a glare in the final photo. Whatever lighting you are using, take artwork out of any glass-covered frame, or photograph the work before framing it. The glass reflects light and causes the photo to show both a hot spot and reflections of anything in front of the art, including you and the hanging plant behind you. Photo editing software can fix the color balance (called color correction) and brightness if the illumination is too low overall, but software can’t easily compensate for reflections or bright and dim spots across the image. Tripod Using a tripod is helpful for two reasons. First, it ensures a sharp image by keeping the camera completely still. Second, it allows you to center the camera directly in front of flat artwork or to position it around a three-dimensional piece. If the camera is above or below the center of flat art, the corners will not be square in the photo. Without a tripod it is very easy to turn a canvas into a parallelogram instead of a rectangle. Then you have to decide whether to crop or trim off part of the art to make it square or leave it skewed, which is very distracting to a juror. Either way, the image is not an accurate representation of the art you created. Background The background you place the art against becomes part of the total image if you do not crop (cut) it out, so choose carefully. I’ve seen many a brick wall or garden competing with the art for attention in a photo. For two-dimensional work, even when you plan to crop the photo to the edge of the art, a colored background can reflect colored light onto the art and change its look. Stick to a neutral-colored background, such as gray, beige, or black. If you have enough light to photograph indoors, hang your art on a neutral-color wall. For three-dimensional work with its irregular edges, cropping the image out of the background is difficult to do well, so you are stuck with the background you photographed. A simple setup that will give a professional look is a box with the front and top cut out and the inside covered with a piece of neutral-colored or black untextured fabric that is not shiny. Velvet and felt are great choices. The box needs to be wide enough that the corners do not show in the final crop. |
|
Preparing a Digital File
Photoshop is the professional standard for editing photos, but it is expensive and difficult to learn. Fortunately, there are simpler alternatives. Picasa and iPhoto, for example, are free and have plenty of power to crop, resize, rotate and do simple lighting corrections. Photoshop Elements has more features than the free software but costs much less than Photoshop. Get to know the software you choose by playing around with it on a sample photo before you are in a time crunch with your submission images. **Always make any edits to a COPY of the the original file!** Editing and Cropping Two-dimensional art is usually cropped to eliminate the background completely and present a rectangle of art with no frame or margin. For three-dimensional art, you will often submit two or three views from different angles to give the jurors an idea of how it looks from all sides. These images are not cropped to the edge of the art, so how much of the background should you leave showing? Because you want to draw attention to the artwork and not the background, let the art fill most of the photo frame and leave margins like page margins around it. With both 2D and 3D work, you may want to take close-up photos to show the details. Instead of taking separate photos, you can crop your main image to show a detail and save it as a separate file. Resizing the Image The size of the image is important for a couple of reasons. First, most digital cameras produce large image files that are detailed enough to print at 8 x 10 inches or larger. These files take up a lot of digital space and are too big to email. They also may slow down the jurors’ computers, especially if they have dozens of entries to go through. The second problem is that the images are literally too big for a computer monitor. So when the jurors open the file, they may see only part of the photo and have to resize it to fit their screen. Part of your job is to make the jurors happy to see your art, so make it easy for them. There is a lot of confusion about resolution, dpi (dots per inch, a printing term), and image size on computers. Rather than try to understand it all, just learn to set two numbers, the resolution and the pixel dimensions. Fortunately, editing software takes care of resolution automatically. Just choose Save for Web (Elements) or Export (iPhoto and Picasa) to reduce the resolution to the correct number, 72 pixels per inch. The same dialog box lets you choose the pixel dimensions. The number of pixels (tiny squares of light that make up the whole image) on a typical computer monitor is at most 1600 pixels wide and 1200 pixels high. So set your pixel dimensions close to these numbers, neither much larger nor smaller. More detailed directions are easy to find online. Here is one. **Save your changes as a new file and keep the original camera file at the original size! You want to preserve the high-resolution image for printing. ** File Formats If the Call for Entries specifies a file type, follow the instructions. If there are no guidelines, you want to make sure that anyone who needs to can view the file; therefore, save the file as a TIFF or JPEG, both of which are easily viewable on Macs and PCs. Mac users, don’t forget to turn on the checkbox “Show file extension” when you save. Do not compress TIFF files. Use the “highest quality” setting for JPEG files.
|


Hope and the Visual Arts by Kate Van Dyke is licensed under a Creative Commons Attribution-NonCommercial-NoDerivs 3.0 Unported License.
Based on a work at www.hopeva.weebly.com.
Permissions beyond the scope of this license may be available at http://www.hopeva.weebly.com.
